- Fluid
- Helm
- Kubernetes
How to deploy and run Fluid Framework server and application
January 16, 2021 • 4 min read
Learn to get a Fluid application running online, beginning to end.
In this tutorial, I will go through how to deploy a Fluid Framework application. Once you complete this, you will have a working Fluid service that you can use to load Fluid applications and collaborate with others.
This tutorial adds on to the original one by Kurt Berglund, so I will be using the resources mentioned there. However, I will go through other details such as setting up the Kubernetes Cluster, Ingress, and SSL. Check out their tutorial to get more details on Fluid.
What You Need
This tutorial follows a deployment to the DigitalOcean platform. However, if you set up your Kubernetes cluster on another cloud platform it should also work.
- A registered domain (I will be using flvyu.com)
- A DigitalOcean account (Get 100 dollars in credit)
Set up a Kubernetes Cluster
In order to deploy our Fluid app, we need a Kubernetes Cluster available. This will allow us to run and manage the containerized applications we will need for our Fluid app.
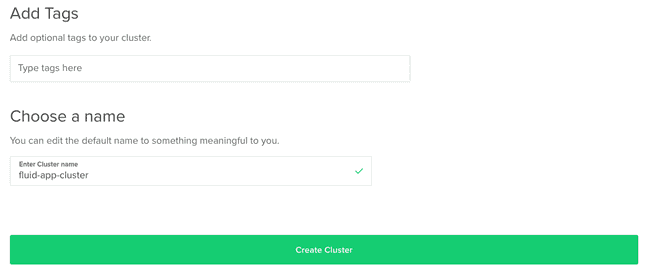
In your DigitalOcean account, go ahead and create your Kubernetes Cluster and set the proper configurations and name.
This process will take a few minutes.
While that is working, set up the management tools to connect to the cluster from your local or development machine. Click on the links below to get those set up on your machine.
- Install Kubectl on your machine
- Install doctl, the DigitalOcean Command Line Tool
- Connect to your DigitalOcean kubernetes cluster
Steps 2 and 3 are DigitalOcean Specific, so don't follow those steps if you are using a different cloud platform. Make sure to follow the steps specific to the platform you are using to connect to your cluster.
Once that is done, make sure the following command runs successfully.
1kubectl get nodes
Setup an Ingress
In order for our application to be accessed online, we need a way to route external traffic to services in our cluster. We will do this with Kubernetes Ingress. By using an ingress, we will have rules for routing our HTTP and HTTPS traffic to the correct Kubernetes services in our cluster through Ingress Controllers.
There are multiple Ingress Controllers available, but we will be using the Kubernetes Implementation of the Nginx Ingress Controller. Since we our Kubernetes Cluster is on DigitalOcean we will be deploying the DigitalOcean version. If you are on a different platform, check out the installation guide for the Kubernetes Nginx Ingress.
Once we deploy the DigitalOcean version to our cluster, it will spin up a LoadBalancer that will route external traffic to the pods running the Nginx server.
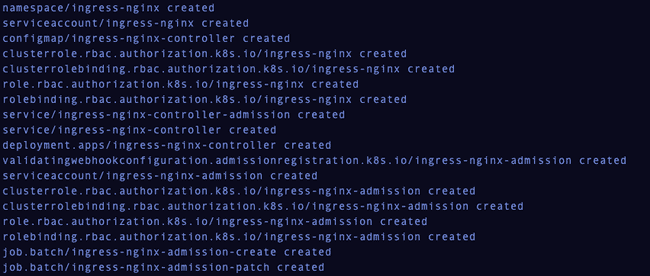
Run the following command to setup the Nginx Ingress Controller in the cluster.
1kubectl apply -f https://raw.githubusercontent.com/kubernetes/ingress-nginx/controller-v0.43.0/deploy/static/provider/do/deploy.yaml
You should see the following.
Check that the ingress-nginx pods have started
1kubectl get pods --namespace ingress-nginx
Check that the controller services are running.
1kubectl get services --namespace ingress-nginx
Configure Domain A Records
Before deploying our Fluid service, let's setup the domain configurations we need in order to view our application online.
In your domain registrar, you will need to create A records for the domain
used to access and use your Fluid Application. The A record needs to point to the External IP address of your
LoadBalancer. In this example, the External IP Address is 134.209.131.230, as you can see from the image directly above.
In your domain's DNS settings, create the following A records.
| Name | type | TTL | Data |
|---|---|---|---|
| tinylicious | A | 1h | LoadBalancer-External-IP-address |
| gateway | A | 1h | LoadBalancer-External-IP-address |
| pod-pod-work-around | A | 1h | LoadBalancer-External-IP-address |
If you are not using DigitalOcean you might not need the last A record. I will explain later what this is for.
Note: It will take some time for these configuration to fully take effect.
While that's working, we can continue to the next steps.
Installing Cert-Manager for SSL
In order to have SSL certificates for our services, we will use cert-manager to install, provision, and manage them.
Run the following to setup cert-manager.
1kubectl apply -f https://github.com/jetstack/cert-manager/releases/download/v1.1.0/cert-manager.yaml
Check the cert-manager pods are running.
1kubectl get pods --namespace cert-manager
Finalizing SSL Certificates (DigitalOcean)
The charts used for deploying the Fluid service and gateway uses Let's Encrypt as the certificate issuer. Before the certificates can be issued, cert-manager performs a self-check. However, in DigitalOcean this self check was failing. If you were to continue to the deployment of the Fluid service you will see you can load the apps, but the domain is still marked as not secure because the certificates failed to be issued. If you follow this step before going to the fluid deployment section, this should be fixed.
To fix this, you will need to annotate the Ingress for the LoadBalancer with the following configuration.
Create a file called ingress-nginx-svc.yaml and paste the following. Update the service.beta.kubernetes.io/do-loadbalancer-hostname to reference your
hostname and save it.
1apiVersion: v12kind: Service3metadata:4annotations:5service.beta.kubernetes.io/do-loadbalancer-enable-proxy-protocol: 'true'6service.beta.kubernetes.io/do-loadbalancer-hostname: 'pod-pod-work-around.flvyu.com'7labels:8helm.sh/chart: ingress-nginx-3.19.09app.kubernetes.io/name: ingress-nginx10app.kubernetes.io/instance: ingress-nginx11app.kubernetes.io/version: 0.43.012app.kubernetes.io/managed-by: Helm13app.kubernetes.io/component: controller14name: ingress-nginx-controller15namespace: ingress-nginx16spec:17type: LoadBalancer18externalTrafficPolicy: Local19ports:20- name: http21port: 8022protocol: TCP23targetPort: http24- name: https25port: 44326protocol: TCP27targetPort: https28selector:29app.kubernetes.io/name: ingress-nginx30app.kubernetes.io/instance: ingress-nginx31app.kubernetes.io/component: controller
Apply the configuration.
1kubectl apply -f ingress-nginx-svc.yaml
Once you do that, the nginx controller will have the updated configuration.
Helm
Helm is a Kubernetes package manager that we will use to deploy and run our Fluid service. If you don't already have helm on your machine, go ahead and install it before continuing.
Fluid Service Deployment
To deploy our Fluid application, we need to have a Fluid service running. Since we are following the original tutorial, we will deploy the tinylicious Fluid service.
To get tinylicious running on the cluster, we will do so using helm charts Kurt Berglund has made available.
Run the following to create a helm repo called fluid-app which will have the helm charts we need for our
deployment.
1helm repo add fluid-app https://kurtb.github.io/charts
With the helm charts available, we can spin up the tinylicious service.
1helm install --set host=tinylicious.flvyu.com,clusterIssuer=letsencrypt-prod tinylicious fluid-app/tinylicious
This command will use the tinylicious helm chart to install and run the tinylicious ingress and deployment. It sets the host value used to access the tinylicious service online, and the certificate issuer, so we can have SSL certificates. Notice the host should follow the A record name we had configured previously.
In order to view and run our fluid app, we need to also install tinylicious-gateway, which Kurt has implemented.
1helm install --set host=gateway.flvyu.com,key=jwt_signing_key,clusterIssuer=letsencrypt-prod,tinylicious=https://tinylicious.flvyu.com gateway fluid-app/tinylicious-gateway
Verify the Fluid pods are running.
1kubectl get pods
At this point, you should be able to load a collaborative ink canvas 🎉. If you don't like that the
user has to access it through the gateway, one thing you can do is load it in an iframe in a page running onyour-host.com.
1https://gateway.yourhost.com/my-id?chaincode=@kurtb/canvas@0.1.0
Conclusion
You should now have successfully deployed the tinylicious Fluid service and be able to load Fluid apps through the gateway. I want to give a big thanks to Kurt Berglund, for creating the Helm charts, gateway server, and other resources needed to get this working.
Let me know if you have any questions or get stuck.


