- Gatsby
- React
- JavaScript
Add a Featured Image to your Gatsby blog
January 03, 2021 • 1 min read
Learn how to add a featured image to your blog posts
In the last tutorial we built the initial version of our Holiday Blog. However, it lacks a core feature that a lot of blogs have, images. In this tutorial we will learn how to add images to our blog so they appear on the post home page along with the other blog post details.
Featured Images
To add a featured image to each blog post, we will add a field in the frontmatter of our blog's content that will have the path to our image. This will allow us to query our image once it is transformed with the plugin, gatsby-plugin-sharp.
In order to render our images , we will be using the gatsby-image package as it offers tremendous performance benefits when it comes to loading and displaying our images.
Installing Plugins
We will need the following dependencies and plugins to render optimized images in our posts. Run the following command to install them.
1npm install gatsby-image gatsby-transformer-sharp gatsby-plugin-sharp
Configuring Featured Images
To support featured images, we need to update our gatsby-config.js so that we pull our images from the correct location in our filesystem. I like to keep the images and the post content separate so I will source my images from a separate directory.
Under the content directory, create a new folder called featured-images
In the gatsby-config.js file, add the following configuration and restart the development server. You should already have the gatsby-source-filesystem plugin installed from the last tutorial.
1...2plugins: [3`gatsby-plugin-material-ui`,4`gatsby-plugin-sharp`,5`gatsby-transformer-sharp`,6{7resolve: `gatsby-source-filesystem`,8options: {9name: `blogPosts`,10path: `${__dirname}/content/blog-posts`,11},12},13{14resolve: `gatsby-source-filesystem`,15options: {16path: `${__dirname}/content/featured-images`,17},18},19...20]21...
Find an image online and place it in the featured-images directory. Here is a Photo by Jude Beck on Unsplash that I found.
Now we can reference the image in the frontmatter of our posts. Make sure to add images to all your posts so your site does not break. We have to do this since the featuredImage is not an optional field for our GraphQL query.
1---2title: 'History of New Years'3date: '2020-11-28'4author: 'Awesome Developer'5featuredImage: '../featured-images/happy-new-year-2021.jpg'6---
Rendering featured Images
With the path to the featured image in the frontmatter. We can now query it in our view and render it.
1import { Container, Typography } from '@material-ui/core'2import { Link, graphql } from 'gatsby'3import { Theme, createStyles, makeStyles } from '@material-ui/core/styles'45import Img from 'gatsby-image'6import React from 'react'7import SEO from '../components/seo'89const useStyles = makeStyles((theme: Theme) =>10createStyles({11root: {12flexGrow: 1,13},14container: {15marginTop: 50,16},17blogTitle: {18fontWeight: theme.typography.fontWeightBold,19},20postList: {21marginTop: 50,22},23post: {24marginBottom: 50,25},26postTitle: {27fontWeight: theme.typography.fontWeightBold,28},29excerpt: {30marginTop: 20,31},32})33)3435export default function HomePage({ data }) {36const classes = useStyles()37const title = data.site.siteMetadata.title38const description = data.site.siteMetadata.description3940return (41<div className={classes.root}>42<SEO title={data.site.siteMetadata.title} description={description} />43<Container maxWidth="sm" className={classes.container}>44<Typography variant="h2" component="h1" className={classes.blogTitle}>45{title}46</Typography>47<Typography>{description}</Typography>48<div className={classes.postList}>49{data.allMarkdownRemark.edges.map(({ node }) => (50<div key={node.id} className={classes.post}>51<Typography52variant="h5"53className={classes.postTitle}54component={Link}55to={node.fields.slug}56>57{node.frontmatter.title}58</Typography>59<Img60fluid={node.frontmatter.featuredImage.childImageSharp.fluid}61/>62<Typography variant="subtitle2">63{`${node.frontmatter.date} - ⏰ ${node.timeToRead} min read`}64</Typography>65<Typography className={classes.excerpt}>{node.excerpt}</Typography>66</div>67))}68</div>69</Container>70</div>71)72}7374export const query = graphql`75query {76site {77siteMetadata {78description79title80}81}82allMarkdownRemark {83totalCount84edges {85node {86id87fields {88slug89}90timeToRead91frontmatter {92date(formatString: "DD MMMM, YYYY")93title94featuredImage {95childImageSharp {96fluid(maxWidth: 800) {97...GatsbyImageSharpFluid98}99}100}101}102excerpt103}104}105}106}107`
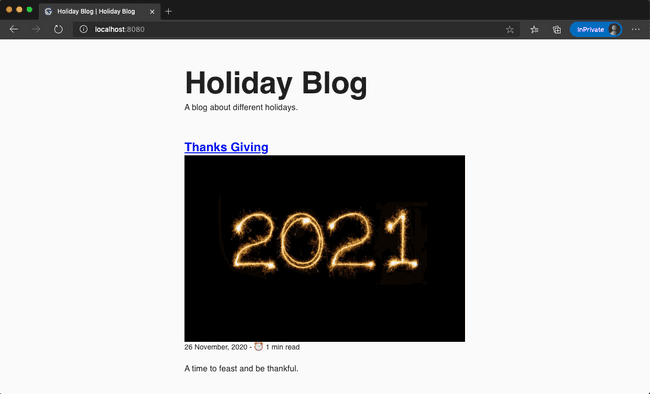
Here is what the site should look like now.
There you go 🎉! You should now be able to have featured images in your blog.
If you liked this content, make sure to subscribe to the newsletter for more.


